
These charming treats are the heart and soul of dessert lovers worldwide – and, unsurprisingly, the chocolate kind is the most trending treat on social media. This multi-layered masterpiece combines the rich flavours of cocoa with a creamy texture, which is why it’s a beloved option for both dessert lovers and chefs. Let's delve into the history, meaning, and tips for crafting this heavenly treat, along with two irresistible recipes.


The History and Meaning of the Dream Cake
This sweet dish has its roots in the pursuit of culinary excellence. It represents the aspiration to craft extraordinary delicacies, delivering an unforgettable experience for anyone who tries them. The chocolate variety, in particular, embodies this idea of perfection, combining cocoa goodness in a symphony of flavour and texture.
Tips for Making a Dream Cake
Crafting a five-layer premium dream cake might seem like filling some big shoes. However, our recipes require only attention to detail and a passion for perfection. Here are some tips to help you achieve bakery-worthy results:
- Opt for high-quality ingredients to ensure a rich, intense flavour.
- Measure everything accurately and follow the instructions for optimal results.
- Take some extra time for layering: it ensures the even distribution of each component for a harmonious composition.
- Allow each layer to cool completely before combining.
- Unleash your inner creator! Consider coconut shavings, edible flowers, or decor to add visual appeal.
Now, let’s look at two chocolate dream cake recipes from scratch.
Easy Recipe for a 5-Layer Chocolate Dream Cake in a Tin
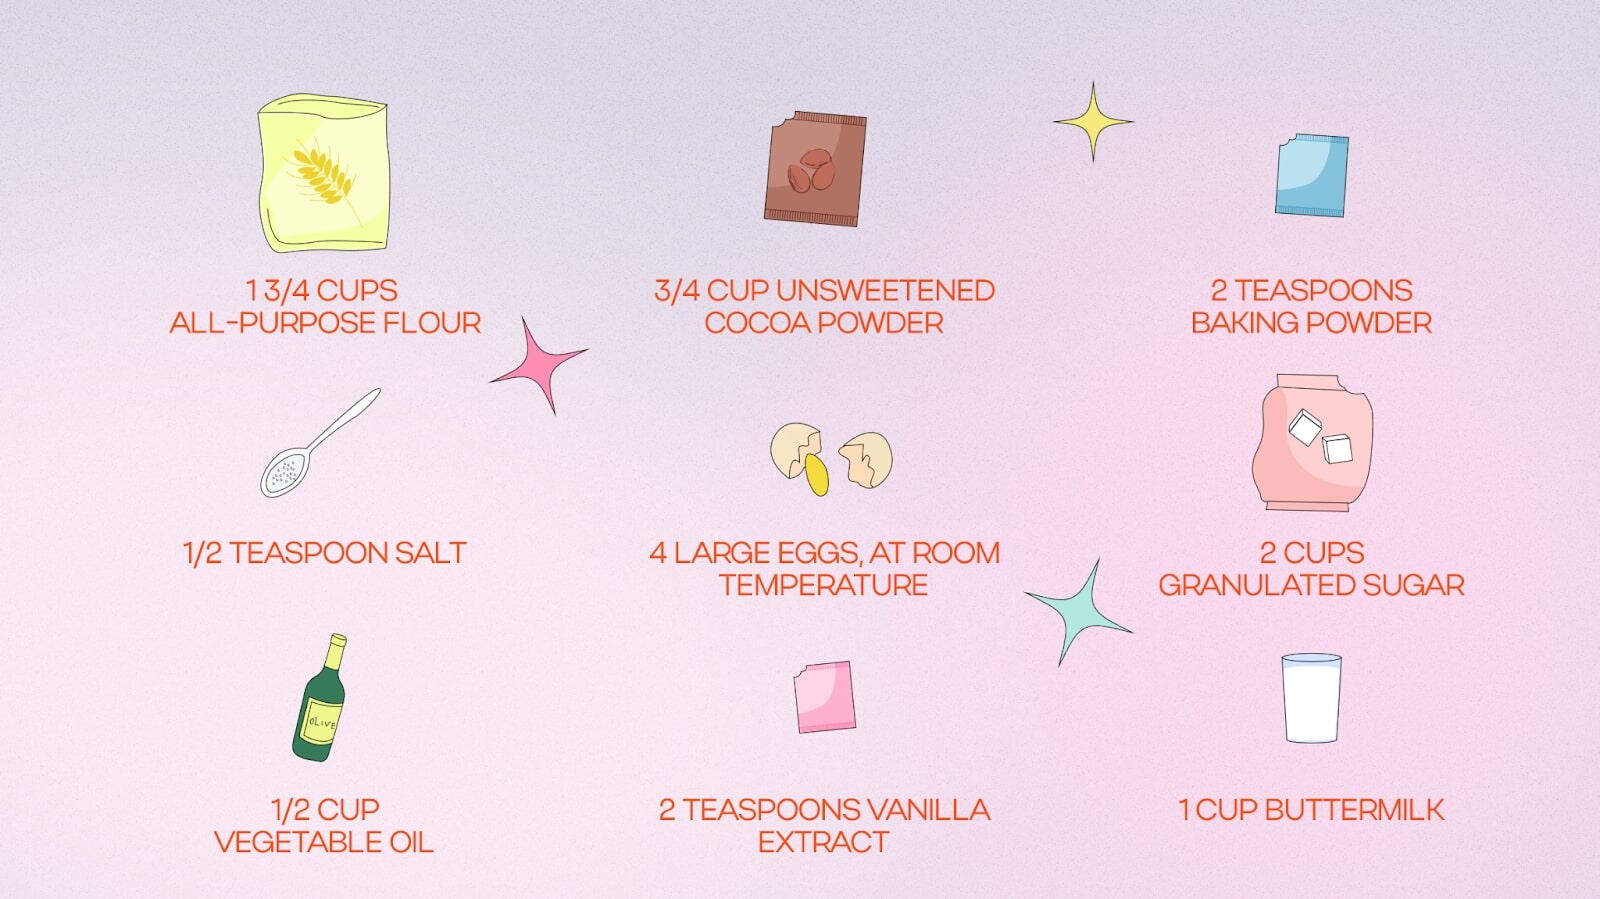
Ingredients
Instructions
First Step: Baking a Chocolate Sponge Base
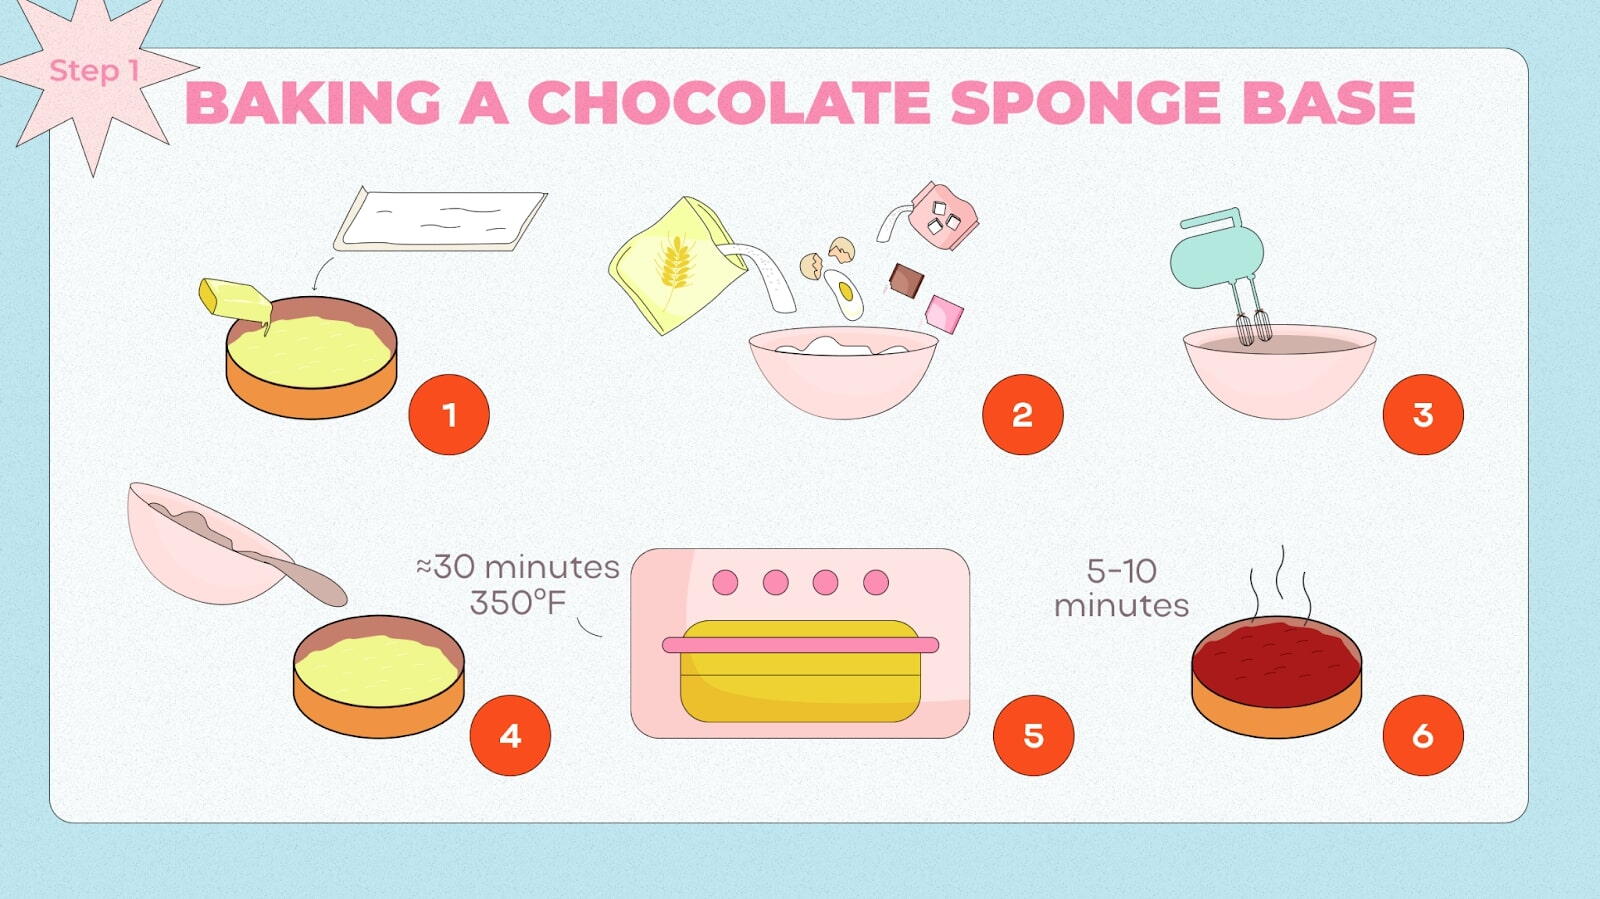
1. Preheat the oven to 350°F (175°C) and prepare the tin. It should be fully greased with butter or cooking oil and covered with parchment paper. Ideally, consider a round 9-inch tin; however, any other shape will also fit. Neatly tuck the leftover paper in the corners if the form has any.
2. Take all of the ingredients and combine them in any mixing container (yes, it’s that simple!).
3. Place the mixture in the oven. Now, it’s time to leave it be for approximately half an hour: you can complete the next phases or take a well-deserved break. To check the readiness of the base, stick a toothpick inside - it should come out completely clean.
4. After baking, let the base cool. The best way to do this is to let it stand for 5-10 minutes and then settle it on a flat surface. If you intend to finish the dish later, you can store it in a cold place.
Second Step: Sugar Syrup for the First Sponge Layer

1. Return to the sponge base: it’s time to place it back inside the tin.
2. Find a pastry brush or spoon and generously brush the syrup over the whole surface of the base until it’s glazed.
3. Leave the syrup for about 10-15 minutes until it fully absorbs into the base.
Third Step: Make the Chocolate Mousse
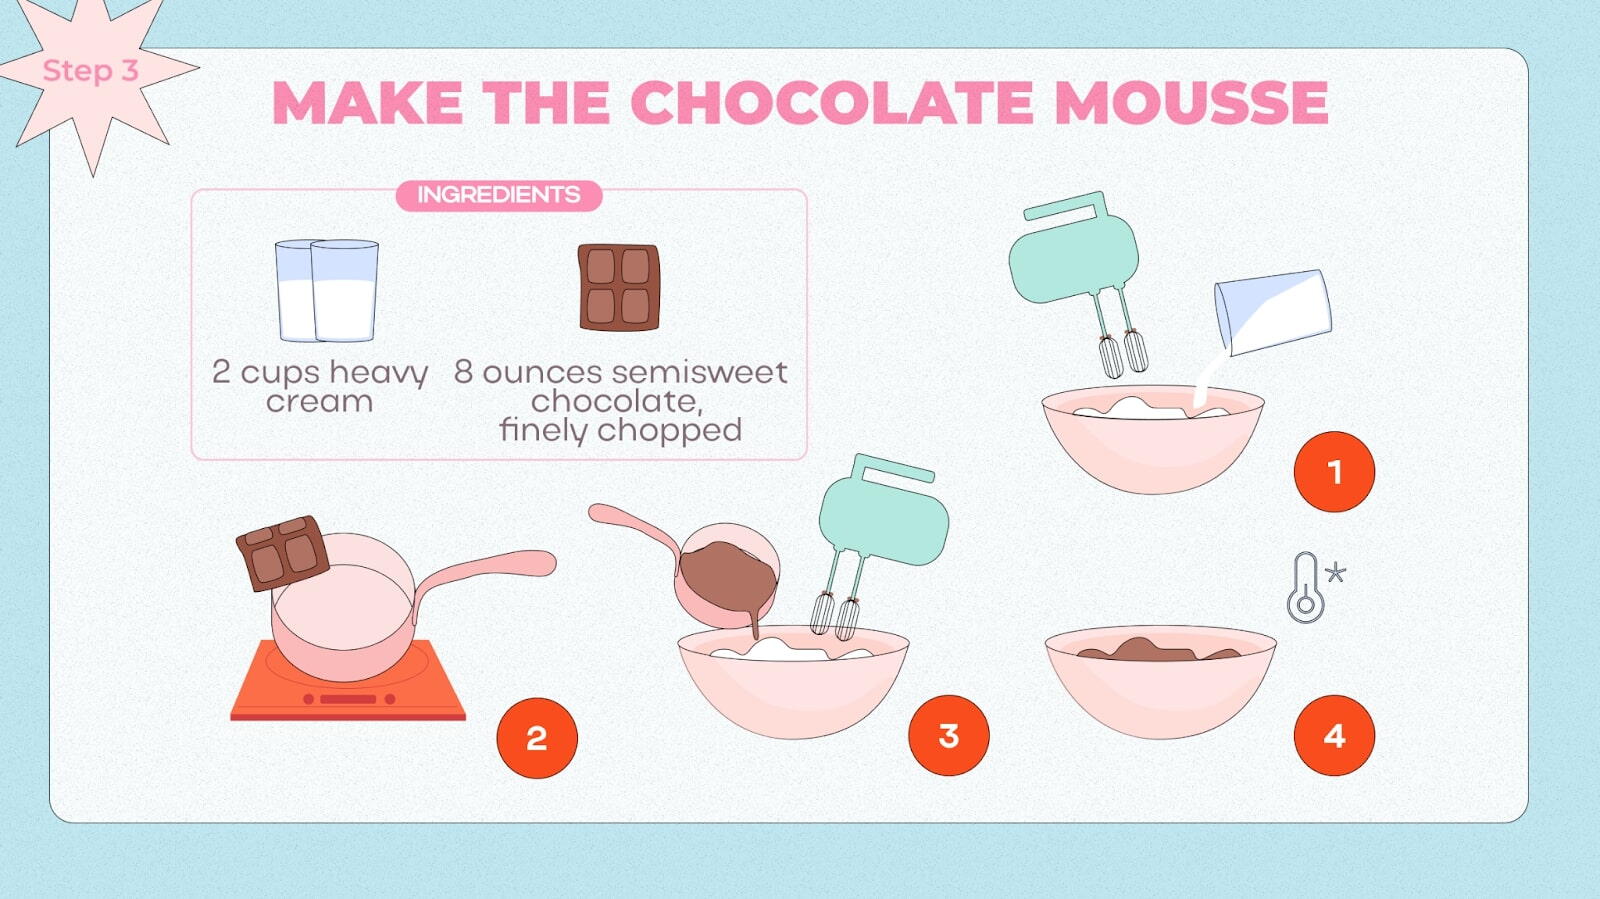
1. Whip the cream until you see soft peaks with a whisk or a mixer. The easiest way is to take advantage of an electric mixer, but it’s essential not to overdo it!
2. Melt the chocolate on medium heat or in a double boiler. Once done, fold it into the cream. Mix very well.
3. Chill the mousse until it sets fully. A well-set mousse should be very thick, with a consistency similar to that of yoghurt.
Fourth Step: Make the Chocolate Ganache
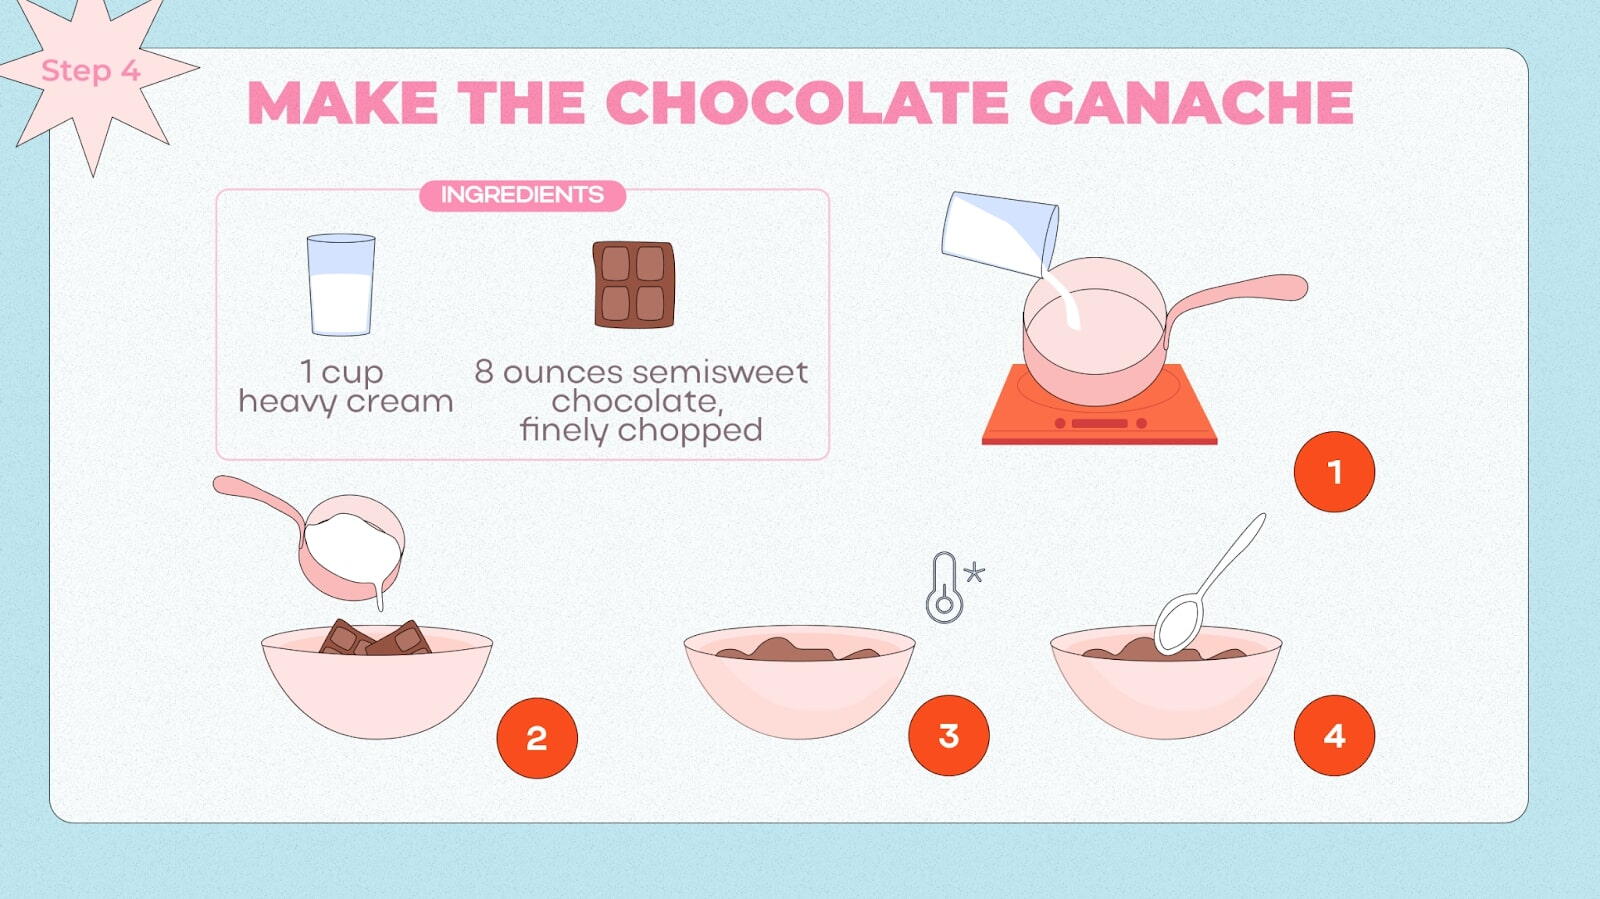
1. Once again, melted chocolate is a necessity for this part. Heat the cream until it starts simmering, then quickly remove it from the stovetop and pour it over the chocolate.
2. Let the mix sit for a bit: it’s necessary to cool it down before we move on.
3. Stir until the consistency becomes smooth and glossy.
Fifth Step: Chocolate Hard Shell
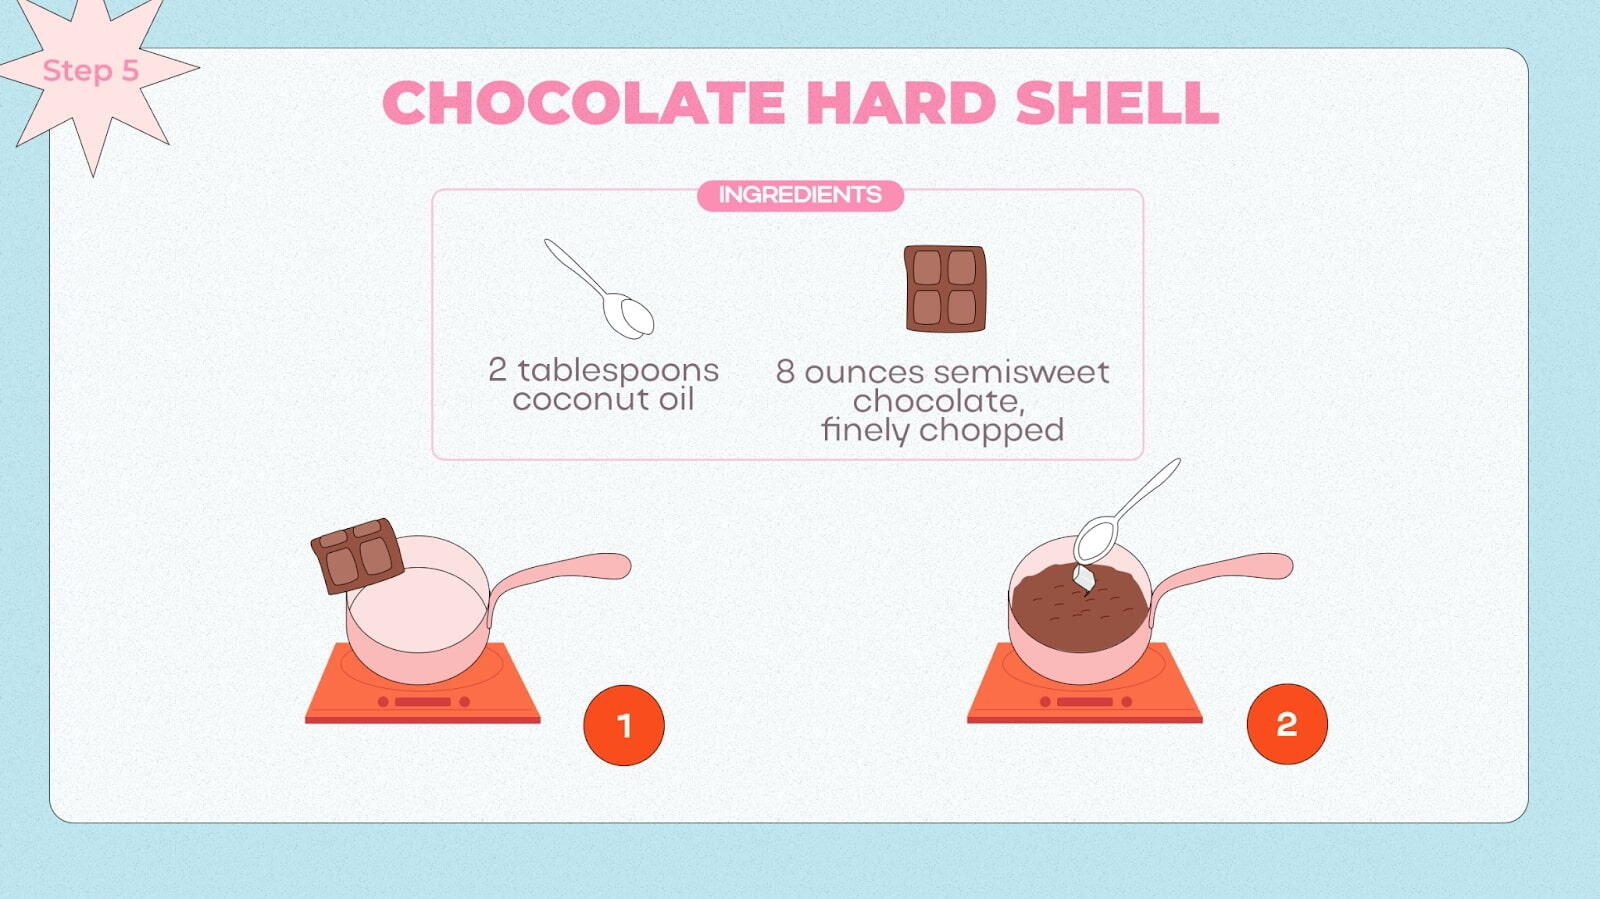
1. Yet again, melt the chocolate, but this time, add coconut oil once it’s fully softened.
2. Without cooling the mix, run it over the chilled base and let it sit for a while.
Final Step: Layer the Cake

1. Now, we can finally assemble all the layers! Start by placing the sponge base in a container. A side note: the container should be slightly wider than the base so you can apply the layers without worrying about spillage.
2. Spread the mousse evenly; cover the sides for a consistent look.
3. Add the ganache on top.
In just five steps, you have a wonderful dessert that is impossible to resist. To enhance your experience, dust it with cocoa, coconut shavings, or sprinkles, and insert some dream cake toppers of your liking.

Chocolate No-Bake Recipe for a Dream Cake
Ingredients
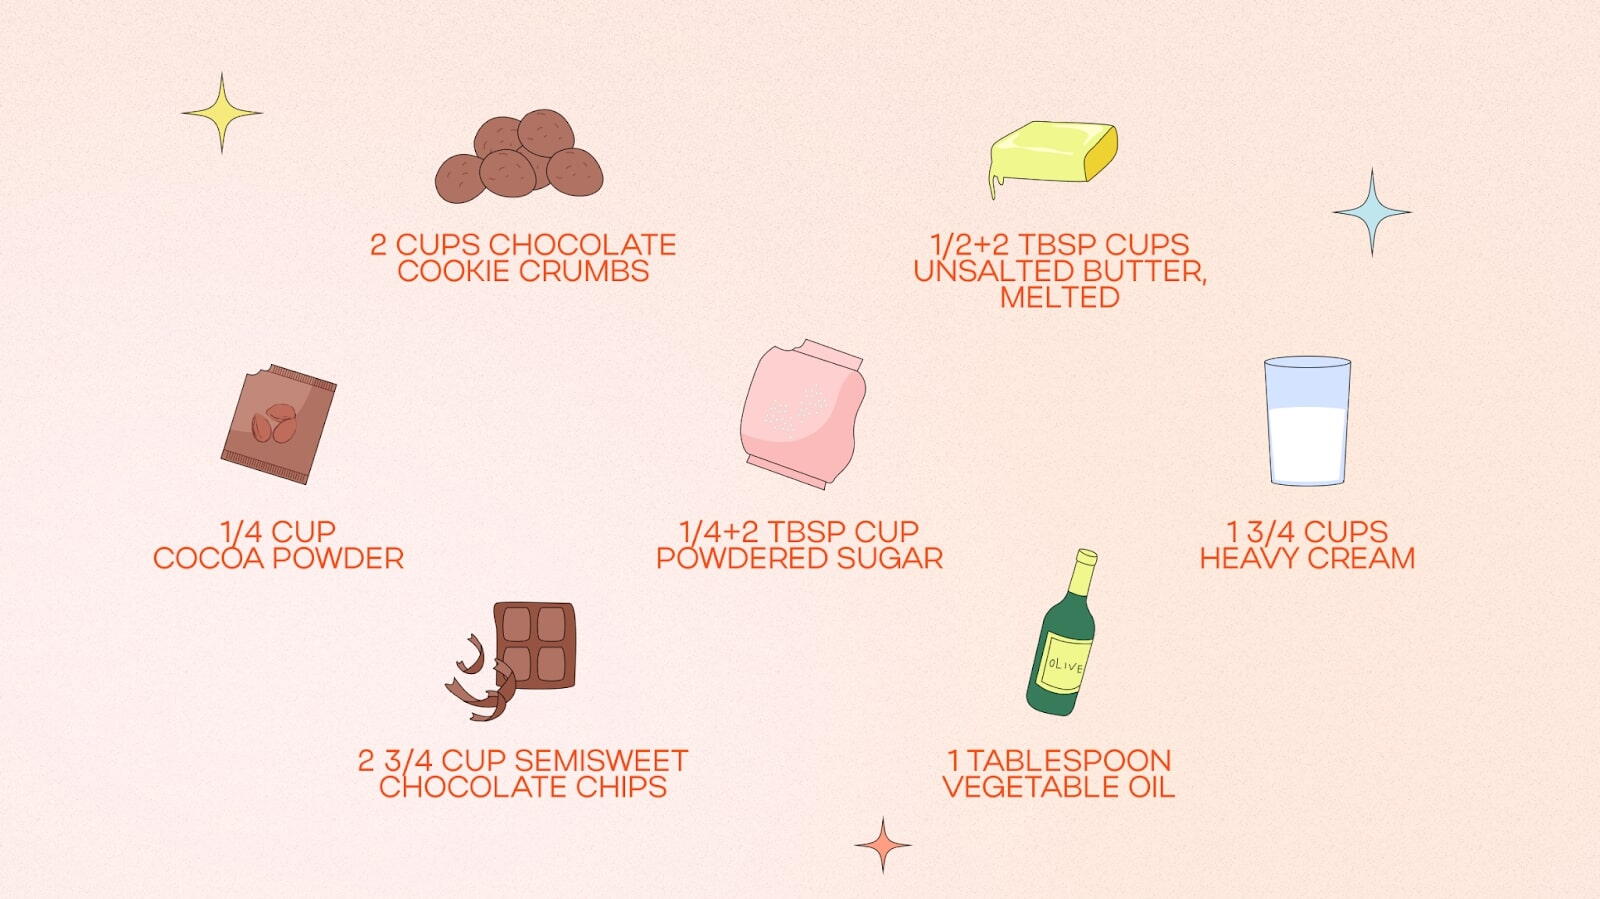
Instructions
1st Layer: Chocolate Cake
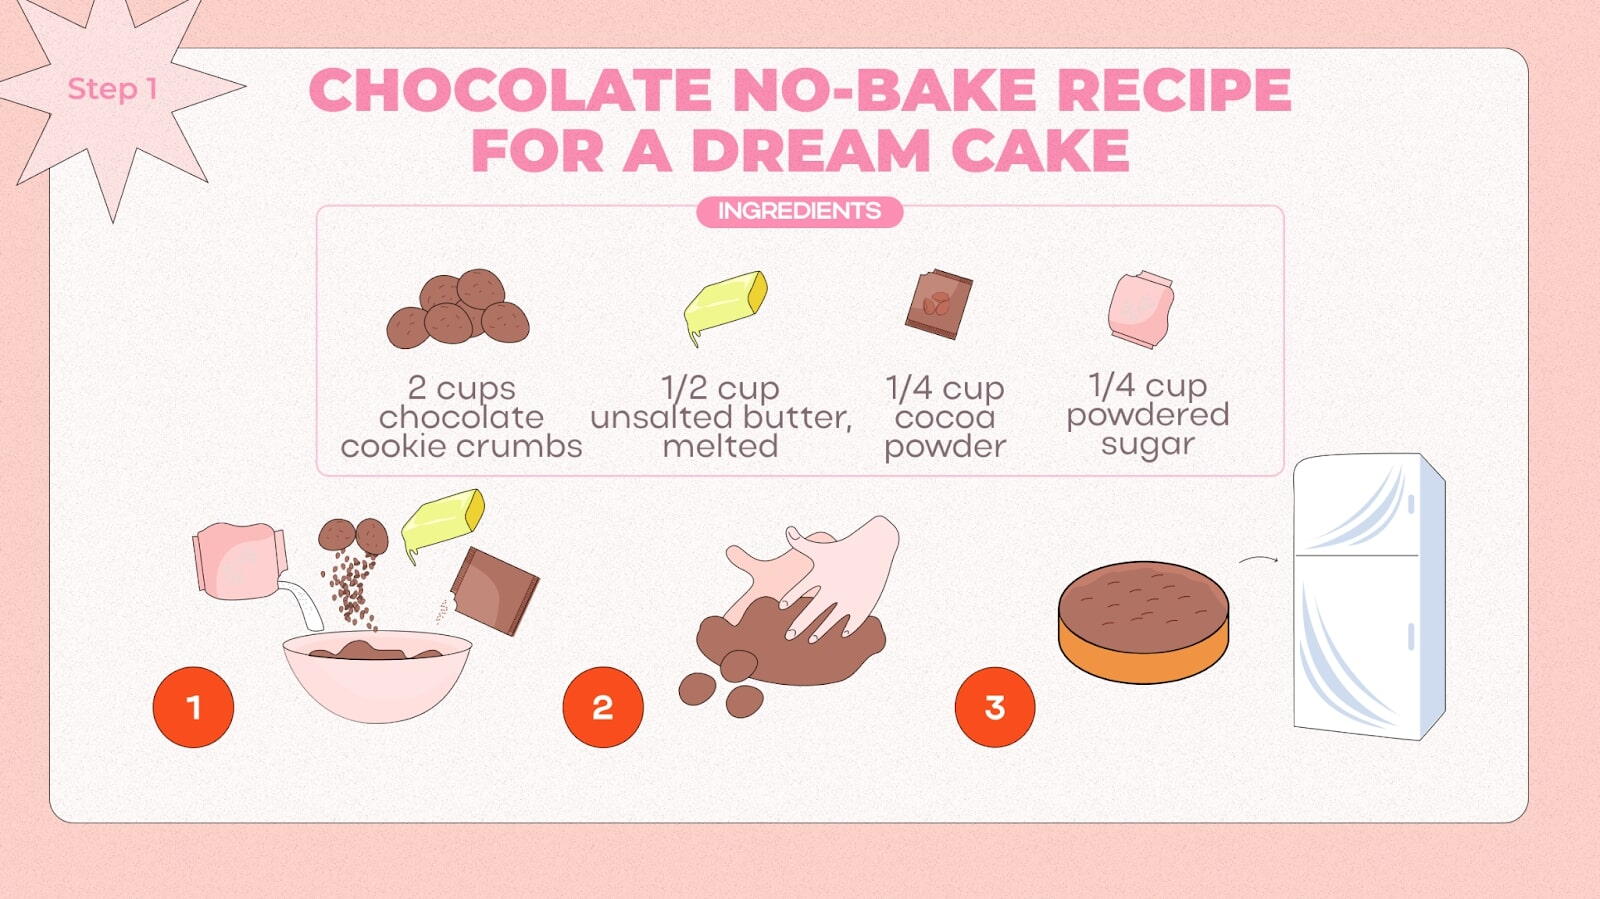
1. To start the process, blend everything in a container and press the result into the tin to form an even layer. As with the previous recipe, a 9-inch form will do perfectly.
2. Place the form in the fridge and move on to the next part: while you’re busy with the other layers, the base will gradually harden, creating the foundation we need.
2nd Layer: Choco Frosting
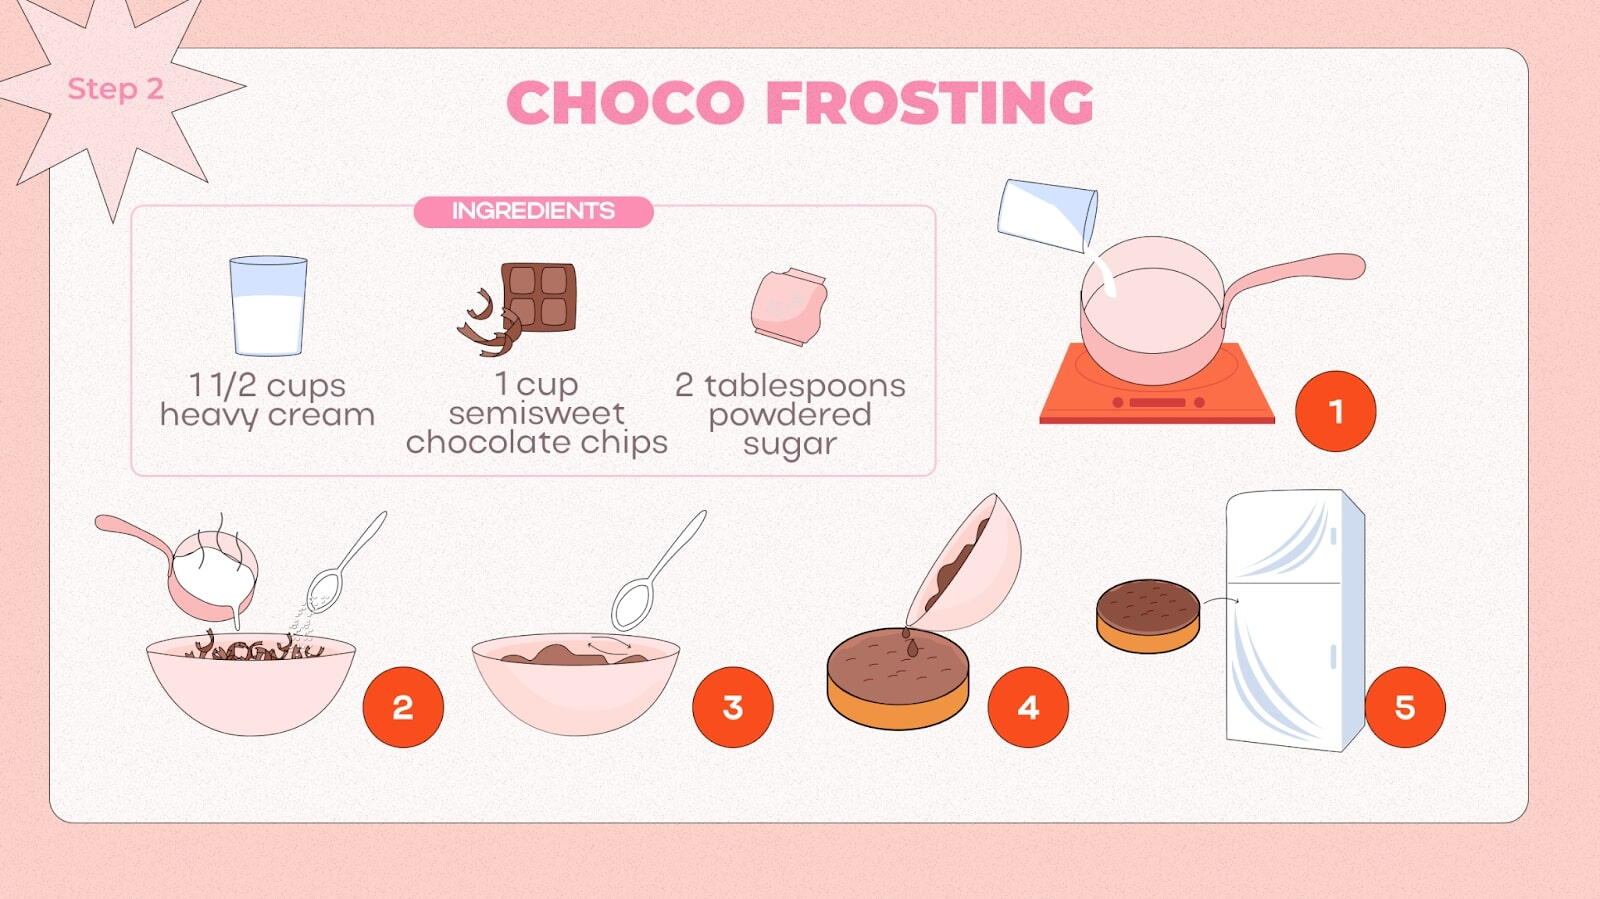
1. Carefully heat heavy cream until it just starts to boil, and remove it from the heat. For this step, you can use a microwave or a stovetop.
2. Gradually pour the hot cream over the chocolate chips. This step should be completed right after moving the hot liquid away from the heat. Otherwise, the chips won't melt properly, leading to clumps. Let it sit for 2 minutes.
3. Keep stirring and adding cream until the mixture becomes perfectly smooth. Any clumps will form an uneven frosting. If you see any imperfections, slightly heat the mix on the stovetop and stir.
4. Fold in powdered sugar.
5. Pour the frosting over the chocolate cake layer and spread it evenly. The base should be still chilled, so don’t remove it too long before the mix is ready.
6. Place the base back in the fridge to set.
3rd Layer: Chocolate Goo
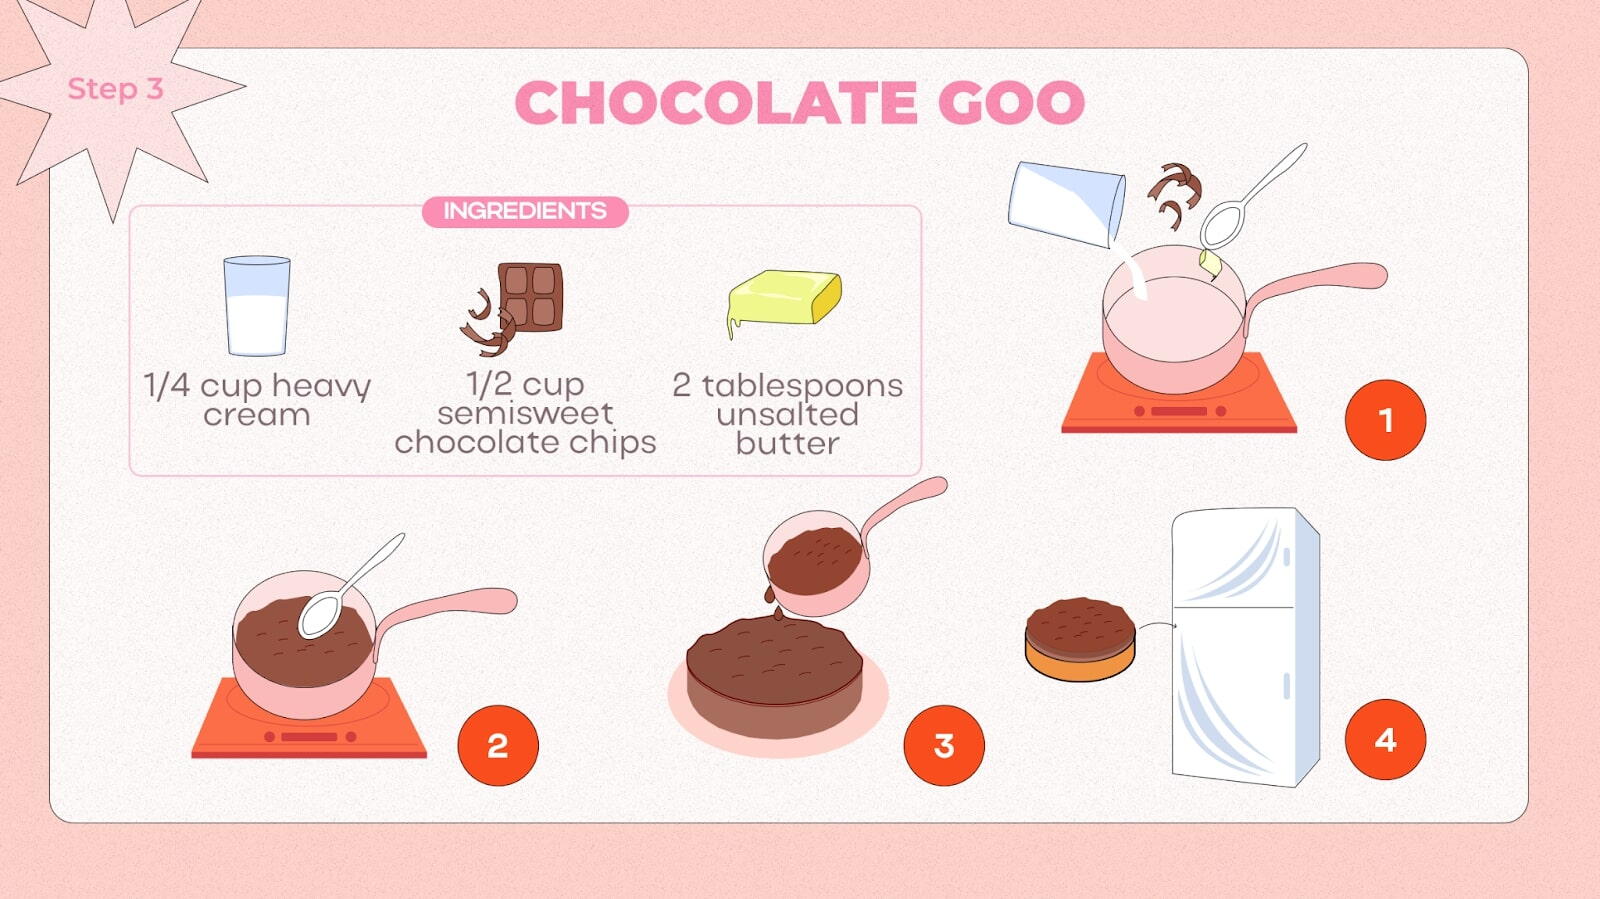
1. Place chocolate chips, heavy cream, and unsalted butter in a small saucepan. Make sure to use a pan with a non-stick surface, as this mix can easily leave a sticky residue on an improper surface.
2. Place the pan over low heat (and only low!), and consistently keep stirring until everything is melted into a smooth mix. Consistently stirring helps the ingredients to distribute evenly and avoid any clumping.
3. Let the goo cool slightly before moving on to the next step.
4. Pour the goo over the base and spread it evenly. Return it to the refrigerator to set.
4th Layer: Chocolate Disc
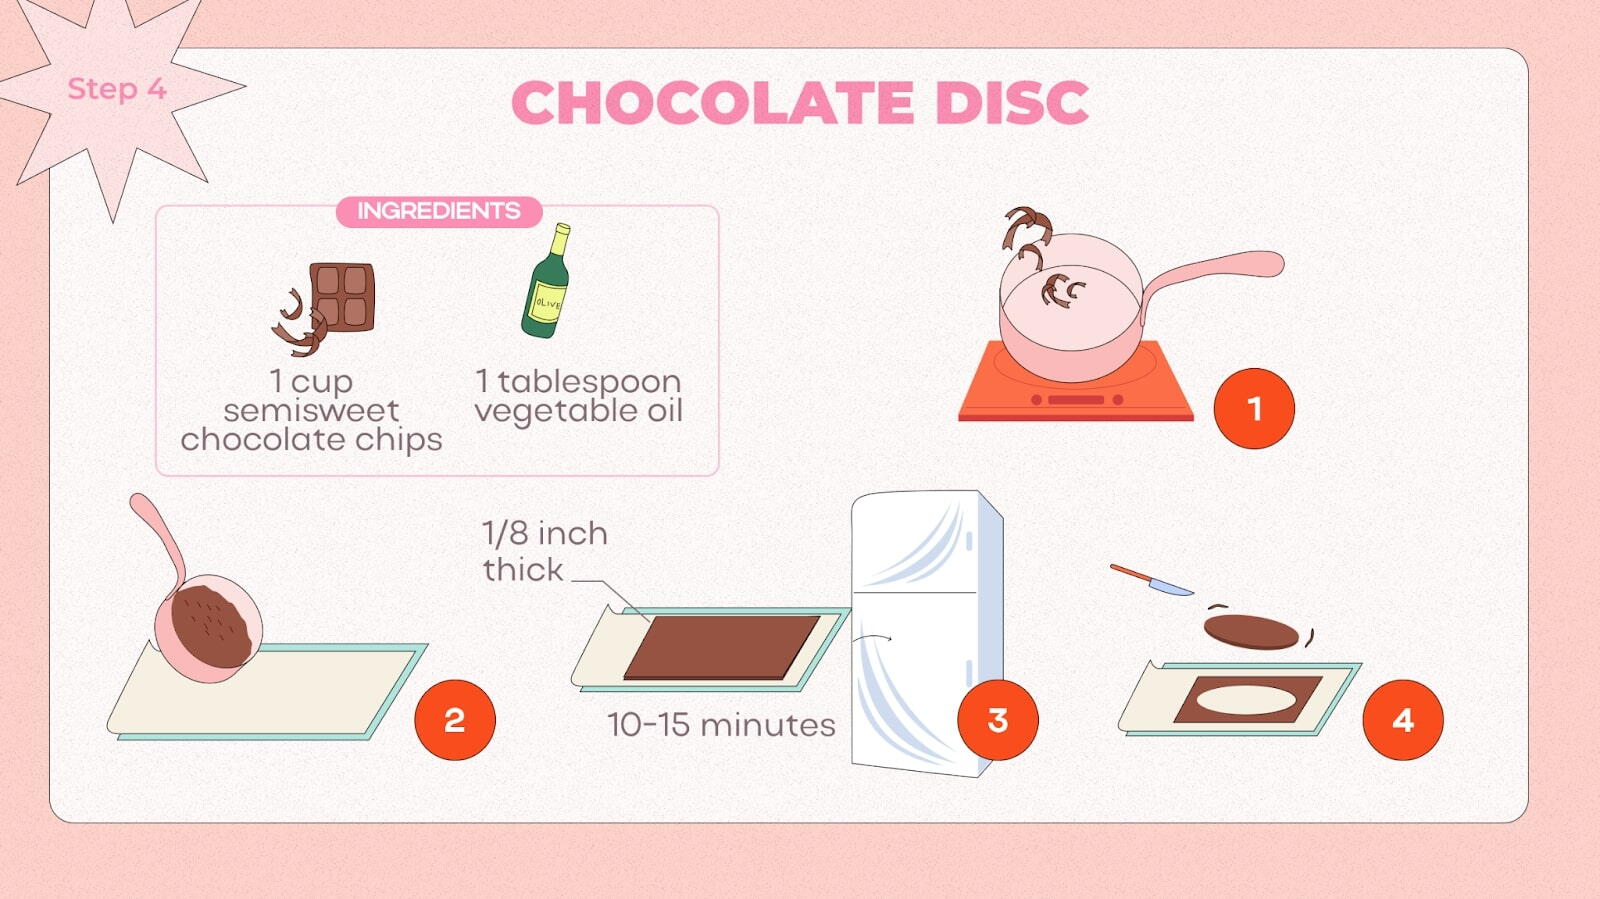
1. For this step, you will need a baking sheet lined with parchment paper. However, any other flat surface will also do: you can even use the same cake tin as previously.
2. Same as before, melt the chocolate with vegetable oil.
3. Pour the mix onto the prepared baking sheet (or surface) and spread it into a thin layer, about 1/8 inch thick.
4. Place it in the fridge until it’s set; usually, it takes about 10-15 minutes. A side note: this process might take slightly longer, depending on the chocolate you choose and its ingredients. Keep checking on the chocolate disc to be sure.
5. Once set, remove the chocolate from the refrigerator and, using a cookie cutter or knife, cut out a disc that fits the size of the cake. Alternatively, just use the underside of your baking tin: it allows for a perfect cutting tool! Carefully transfer the disc onto the chocolate goo layer.
5th Layer: Choco Dust
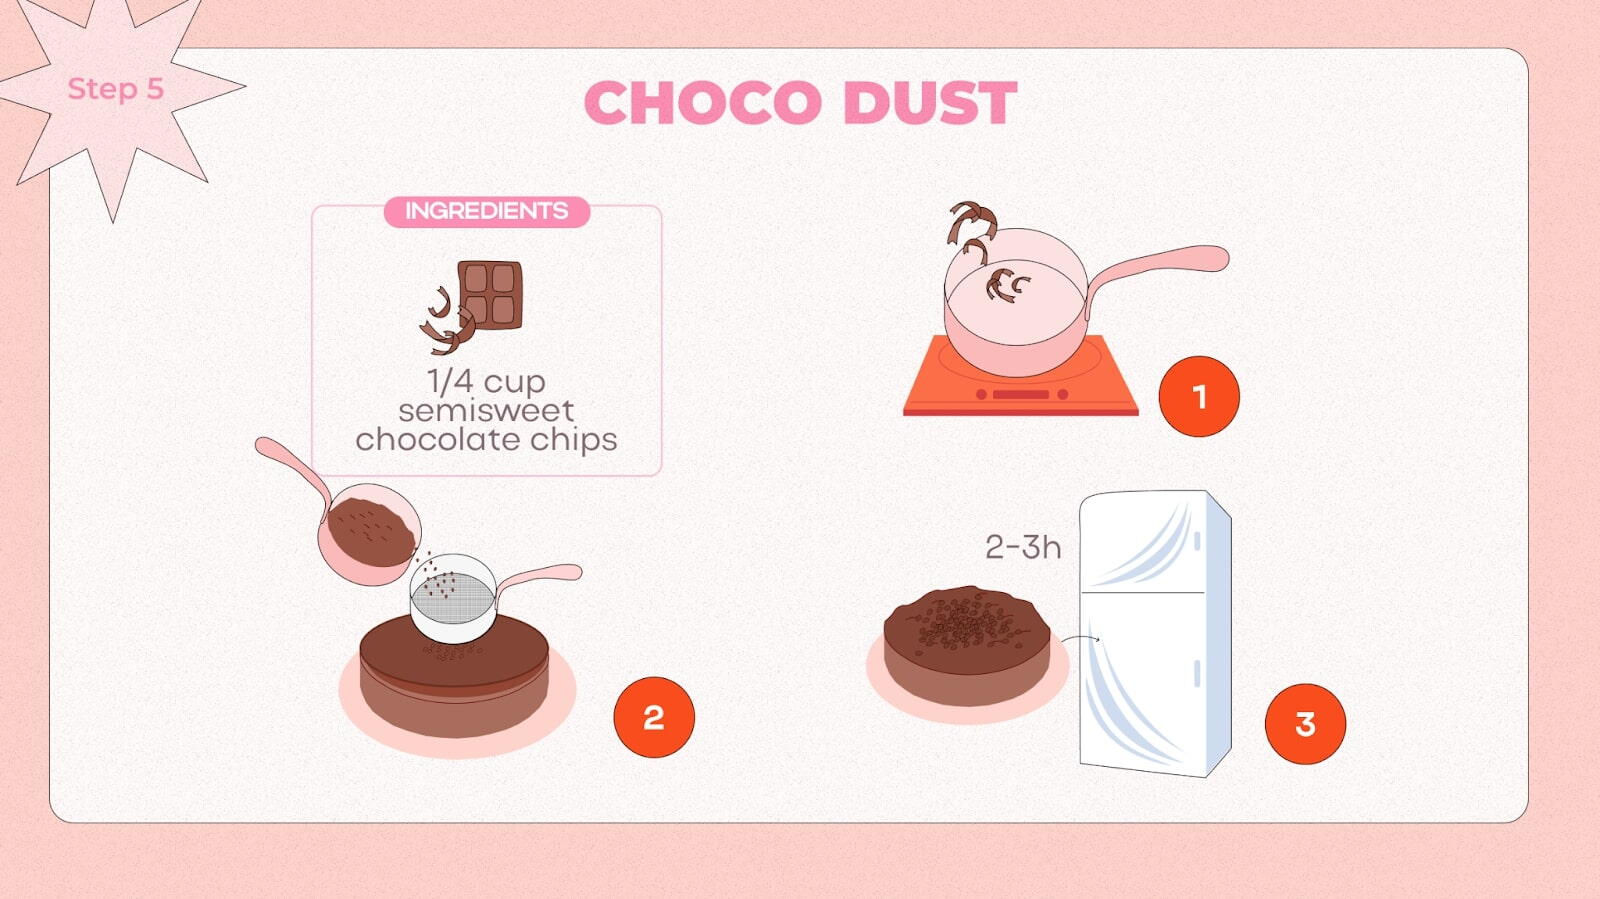
1. Same as before, melt the chocolate chips. For this step, you can skip the oil.
2. Using a fine mesh sieve, dust the melted chocolate over the top of the chocolate disc layer.
3. Return the cake to the refrigerator to set for at least 2 hours or until firm. Once again, the timing will depend on the type of chocolate chosen, so keep checking on your cake. If you’re unsure, it’s always safe to let the dessert sit in the fridge for a bit longer.
4. Once set, your culinary treat is ready! Enhance it with decor or serve it as is.
This recipe is perfect as a present for someone, as it’s most likely to have a sturdy shape and an appealing look. If you choose to gift the dessert, don’t forget to put it in a durable dream cake box.
Where to Buy a Tin Can for a Dream Cake
If you’re looking to create a true dream desert, the proper tin can is essential. Many kitchenware stores and online retailers offer a variety of tins – make sure to choose a sturdy, non-stick form that will ensure your cake bakes evenly and removes effortlessly. Although the dream cake is layered, a normal-height tin is also perfectly suitable for baking as long as it's totally sturdy and balanced.
Finally, don’t forget: baking is all about pleasure! No matter the celebration, a homemade dessert is always an excellent idea. And if you don’t have the time or interest, just order with Flowwow: we offer quick delivery and reliable courier service for chocolate cake lovers.